
Chick-fil-A Cow Puppet Craft: Easy DIY Paper Bag Puppet
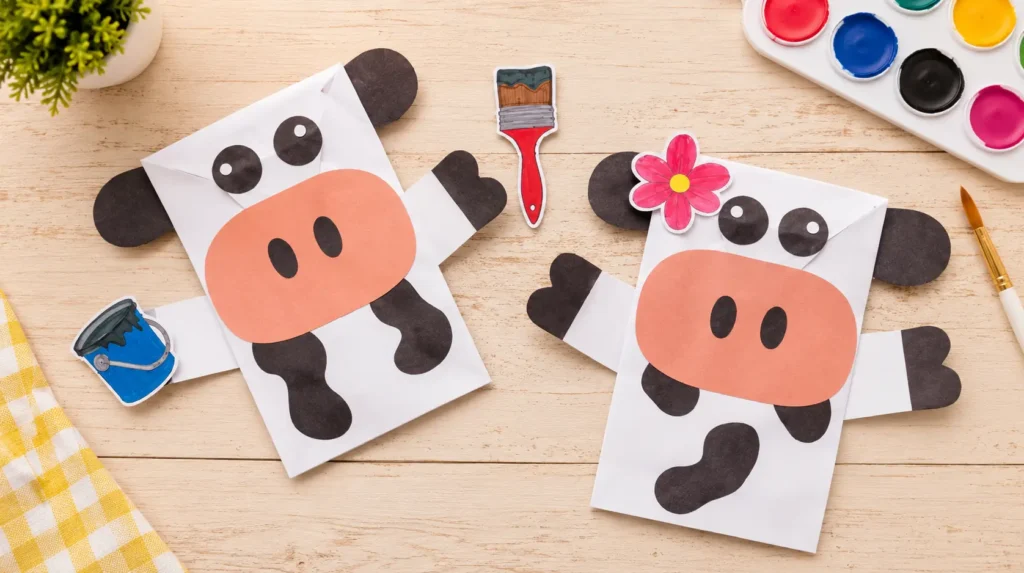
Turn a simple paper bag into a fun cow puppet craft that kids can decorate, play with, and use for their own puppet show. With construction paper, glue, markers, and a few basic craft supplies, you can create a friendly spotted cow in just a few simple steps.
This DIY activity is a great choice for a family afternoon, classroom craft, rainy-day activity, birthday party, or weekend project. Once the puppet is finished, children can bring it to life by moving the paper bag’s flap while creating their own voices and stories.
Craft note: This is an independently created craft guide inspired by the familiar spotted cow theme associated with Chick-fil-A. It is not an official Chick-fil-A publication or endorsement.
Cow Puppet Craft at a Glance
| Detail | Information |
|---|---|
| Difficulty | Easy |
| Best for | Kids, families, classrooms |
| Main material | White paper bag |
| Craft type | Paper bag puppet |
| Approximate activity time | 20–40 minutes |
| Adult supervision | Recommended |
| Main skills | Cutting, gluing, coloring and creative play |
Supplies You Will Need
Gather everything before starting so children can focus on creating their puppet.
Main Materials
- One white paper lunch bag
- Brown construction paper
- Black construction paper
- White construction paper
- Non-toxic craft glue
- Safety scissors
- Non-toxic markers or crayons
- Hole punch
- Pencil
- Optional coloring supplies
Optional Decorations
You can make the finished cow more interesting with extra decorations such as:
- Paper flowers
- Carrots
- Leaves
- Small paper signs
- Bow ties
- Hats
- Paper grass
- Mini accessories
- Colorful background pieces
If you’re making several puppets, prepare extra construction paper so each child can create a different design.
Preparing Your Craft Area
Before cutting and gluing, cover the table with newspaper or a washable tablecloth. Put all supplies where children can reach them safely.
If you’re working with younger children, an adult can help with cutting the smaller pieces while the child handles coloring and gluing.
It’s also helpful to keep paper towels nearby in case glue gets on the table or hands.
How to Make a Cow Paper Bag Puppet
Step 1: Create the Cow’s Spots
Start with black construction paper and cut several irregular shapes for the cow’s spots.
They don’t need to be identical. In fact, different sizes and shapes will make the puppet look more playful.
Glue the spots onto the lower portion of the white paper bag. This area will become the cow’s body.
Tip: Don’t cover the entire bag. Leaving some white space helps the black spots stand out.
Step 2: Make the Cow’s Nose
Cut a large oval from brown construction paper.
Place the oval on the folded flap of the paper bag and attach it with glue. This flap will eventually move when you open and close the puppet’s mouth.
Next, cut two smaller black shapes for the nostrils and glue them onto the nose.
Allow the glue to set before moving on to the next step.
Step 3: Add the Eyes
Cut two black circles from construction paper to create the cow’s eyes.
For an easy pupil effect, use a hole punch to make two tiny circles from white paper. Place the small circles inside the black eyes.
Glue the eyes above the nose.
You can also make the eyes larger or give them different expressions for a more playful character.
Step 4: Make the Ears
Use black construction paper to cut out two cow ears.
The ears can be simple rounded shapes. They don’t have to match perfectly.
Glue or attach the ears to the back of the paper bag near the top.
For extra detail, add smaller pieces of colored paper inside the ears.
Step 5: Create the Cow’s Arms
Use white construction paper to cut two long, simple arm shapes.
Attach the arms to the sides or back of the paper bag.
Then cut small black shapes to represent the cow’s hooves and attach them to the ends of the arms.
Make sure the glue has had enough time to set before moving the puppet.
Step 6: Give Your Cow a Personality
Now comes the most creative part.
Decorate your puppet however you like.
You could give your cow:
- A flower
- A carrot
- A bow
- A hat
- A colorful sign
- A funny expression
- A seasonal accessory
Children can also use markers to add small details to the face or create their own cow character.
Step 7: Bring the Puppet to Life
Place your hand inside the paper bag.
Move your hand so the flap opens and closes like a mouth. Try different voices and expressions to give your cow its own personality.
Your puppet is now ready for a show!
Easy Cow Puppet Template Idea
If drawing and cutting the shapes feels difficult, simplify the project by making a basic template first.
An adult can draw:
- Two ears
- One nose
- Two eyes
- Several spots
- Two arms
- Two hooves
Cutting these pieces in advance can make the activity faster, especially when you’re preparing several puppets for a classroom or party.
Cow Puppet Show Ideas
Don’t stop after making the puppet. Create a short story for your new character.
Farm Adventure
Your cow visits a farm and meets other animals.
The Missing Carrot
The cow discovers that its favorite carrot has disappeared and asks the other characters for help.
A Day at the Farm
Create a story about feeding animals, playing outside, and getting ready for bedtime.
Funny Cow Interview
One child acts as a reporter while another uses the cow puppet to answer questions.
Family Puppet Show
Each family member creates a different character and performs a short story together.
Make Multiple Cow Characters
A puppet show becomes more fun when there is more than one character.
Try making:
- A parent cow
- A baby cow
- A funny cow
- A farmer
- A dog
- A chicken
- A horse
Give every character a different name and personality.
Cow Puppet Craft for Different Ages
Younger Children
Adults can prepare the paper pieces ahead of time. Children can then glue the pieces onto the bag and decorate their puppet.
School-Age Kids
Children can cut their own shapes with safety scissors and design their own characters.
Older Kids
Older children can write a short script and create several puppets for a complete puppet show.
How Long Does This Craft Take?
A basic cow puppet can usually be assembled in around 20 to 40 minutes, depending on the child’s age and how much decoration is added.
If you are making several puppets, prepare the basic shapes ahead of time to save time.
Remember that drying time for glue can vary, so allow the puppet to sit before starting a performance.
What Skills Does This Craft Help Develop?
A simple paper bag puppet can provide more than entertainment.
Children can practice:
- Fine motor skills
- Cutting skills
- Hand-eye coordination
- Color recognition
- Following instructions
- Creative thinking
- Storytelling
- Communication
- Role-playing
Once the puppet is finished, creating a story encourages children to use their imagination and express themselves.
Safety Tips
Keep the activity suitable and safe by following a few simple precautions:
- Use safety scissors appropriate for the child’s age.
- Choose non-toxic glue and coloring materials.
- Adults should supervise young children during crafting.
- Avoid very small pieces around toddlers who may put objects in their mouths.
- Keep glue and craft supplies away from eyes and mouths.
- Allow glued pieces to dry before playing with the puppet.
Easy Ways to Customize Your Cow
Every child can make a different version of the same basic puppet.
Change the Colors
Use different colors for the ears, nose, accessories, or background.
Add a Seasonal Theme
Create a Halloween cow with a small costume, a winter cow with a paper scarf, or a spring cow surrounded by flowers.
Give the Cow a Name
Names make role-playing more fun. Let each child choose a unique name for their character.
Create Different Expressions
Move or redesign the eyes and mouth to make the cow look happy, surprised, sleepy, or silly.
Add a Background
Make a paper farm, barn, field, or sky scene to use behind your puppet show.
Turn It Into a Craft Party
This activity works particularly well when several children are creating puppets together.
Set up separate stations for:
- Cutting paper pieces
- Decorating
- Gluing
- Drying
- Puppet-show preparation
Once everyone has finished, let the children perform a short show for the rest of the group.
Frequently Asked Questions
What is a cow puppet craft?
A cow puppet craft is a simple DIY project that turns a paper bag into a cow character. Construction paper can be used for the spots, face, ears, eyes, arms, and other decorations.
What do I need to make a paper bag cow puppet?
The basic materials are a white paper bag, black, brown and white construction paper, glue, safety scissors, and markers. Optional decorations can make the finished puppet more creative.
Is this cow craft suitable for kids?
Yes. It can be adapted for different ages. Younger children may need help cutting the pieces, while older children can design, assemble, and decorate the puppet independently with appropriate supervision.
How long does it take to make a cow puppet?
Most basic versions can be completed in approximately 20–40 minutes. Additional decorations and drying time may make the activity longer.
Can I make the puppet without a white paper bag?
A paper lunch bag works best because the folded bottom flap naturally becomes the puppet’s mouth. If you don’t have a white bag, another light-colored paper bag can also be decorated.
How does a paper bag puppet work?
Place your hand inside the bag and use your fingers to move the folded flap. Opening and closing the flap creates the appearance of a moving mouth.
Can I make other farm animal puppets?
Yes. The same basic paper bag technique can be used to create pigs, horses, chickens, sheep, dogs, and other characters.
Can I use markers instead of paint?
Yes. Non-toxic markers or crayons are convenient for adding facial details and decorations without the drying time associated with paint.
Can younger children make this craft?
Yes, but adults should help with cutting and supervise the use of craft materials. You can also prepare the shapes in advance so younger children can focus on gluing and decorating.
What can I use for the cow’s spots?
Black construction paper works well, but you can also draw or color spots directly onto the bag. For a more colorful project, try different colors and patterns.
Can I use this cow puppet for a school project?
Yes. It can be used as part of an art activity, storytelling exercise, farm-animal lesson, or classroom puppet show.
How can I make the puppet more fun?
Give the cow a name and personality, create additional characters, make a simple background, and write a short story for the puppet show.
Related Chick-fil-A-Inspired Activities
If your family enjoys creative activities, explore more stories and guides in our Chick-fil-A Stories collection.
You may also enjoy:
- Spots & Sips Craft – Try another cow-inspired painting activity.
- Chick-fil-A Drinks Menu – Explore lemonade, tea, Sunjoy®, coffee, and other beverages.
- Chick-fil-A Catering Menu – Find ideas for serving groups at parties and gatherings.
- Chick-fil-A Milkshake Guide – Learn about popular frozen treats.
- Chick-fil-A Stories – Browse recipes, crafts, seasonal ideas, quizzes, and more.
Final Thoughts
Making a cow puppet from a simple paper bag is an easy way to turn everyday craft supplies into an imaginative play activity. Children can practice cutting, gluing, decorating, storytelling, and performing while creating a character that is uniquely their own.
Start with the basic spotted cow design, then let your creativity take over. Add accessories, create more characters, and finish the activity with a family puppet show.
Disclaimer: This is an independently created informational and craft guide. Chick-fil-A®, its trademarks, logos, characters, and related brand assets belong to their respective owners. This page is not an official Chick-fil-A publication or endorsement.